Skip to content
Back to homepage

How Are Neon Signs Installed?

We explain how simple it can be to hang our LED neon signs, no electrician required!

Which one did your sign come with?

Hanging a neon sign is definitely easier with a buddy, and a power drill too.

Our signs are as simple to install as hanging a painting — one that plugs in and glows! You won’t need an electrician for this one.

What installation options do I have?

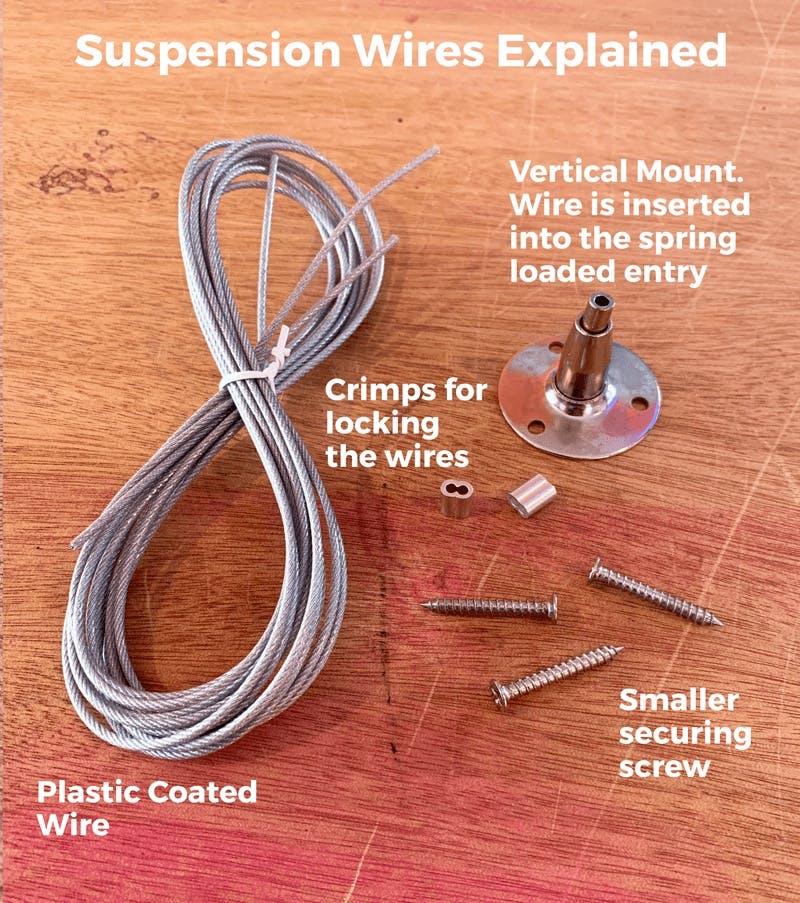
When buying any custom neon signs from Radikal Neon you will receive one of the 3 display options listed here: the Mini Screws, the Stand-off screws, or the Suspension wires. If you didn’t specify how you’d install or use the sign you would have received the mini or stand-off screws.

How to install your LED neon sign using our Mini Screws.

These screws typically come with signs that have a closely cut acrylic backing. Follow this simple 5 step process to learn how to hang a neon sign in minutes.

Step 1:
Lift only your neon sign and place it flat up against the intended wall or space. If it’s super long or heavy please ask a friend for assistance.
Step 2:
Decide where you’re going to be hanging the neon sign. While one person is holding the sign, use a marker pen to dot the pre-drilled holes in the wall where the screws will be going — this will be super helpful when you get the drill out next.
Step 3:
Place the sign back in the box or on a safe surface to avoid scratching the acrylic backing. Get your drill equipped with a smaller twist drill bit than the diameter of the screws and drill pilot holes exactly on the points you marked on the wall using your marker in step 2. If you don’t know how to use a drill, get a friend to help you with this part of hanging the neon sign.
Step 4:
Next, put the sign back up on the wall, and hold it in place to make sure your drilled holes and the holes in the acrylic backing match. Then take the black (or gold/silver) rubber washer and place it directly over your first hole. Then place the small silver screw through the holes. Grab your drill and drill the small screw through the acrylic hole into the pilot hole to secure the hanging neon sign.
Step 5:
Repeat step 4 until all screws are in place. Finally place the small silver end caps on top of the black rubber washers to complete the look.
Final Step:
Now plug the sign into the transformer (black or white box), and then into the wall outlet. It should illuminate no problem. And that’s how you hang a neon sign with mini screws!
mini screws used for hanging a neon sign
close-up of a mini screw in a hanging neon sign

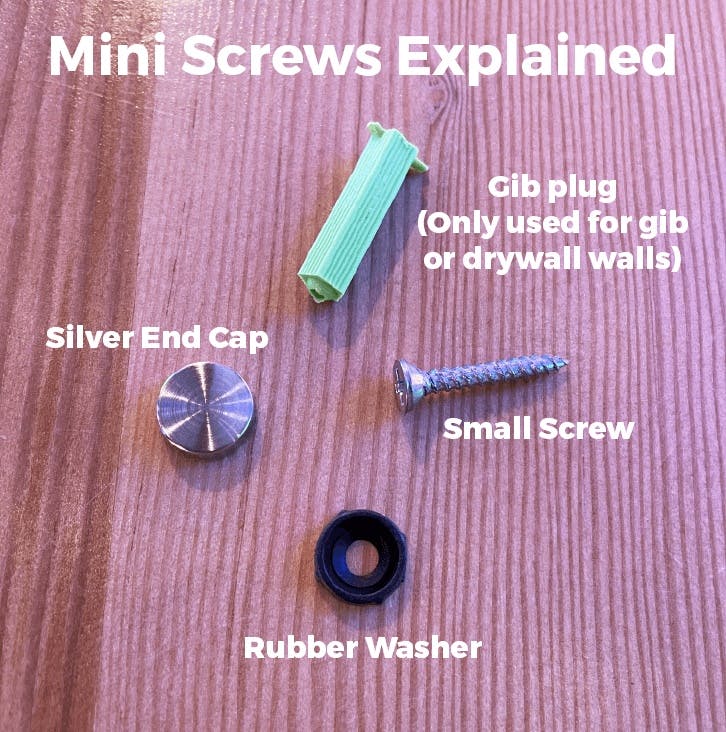
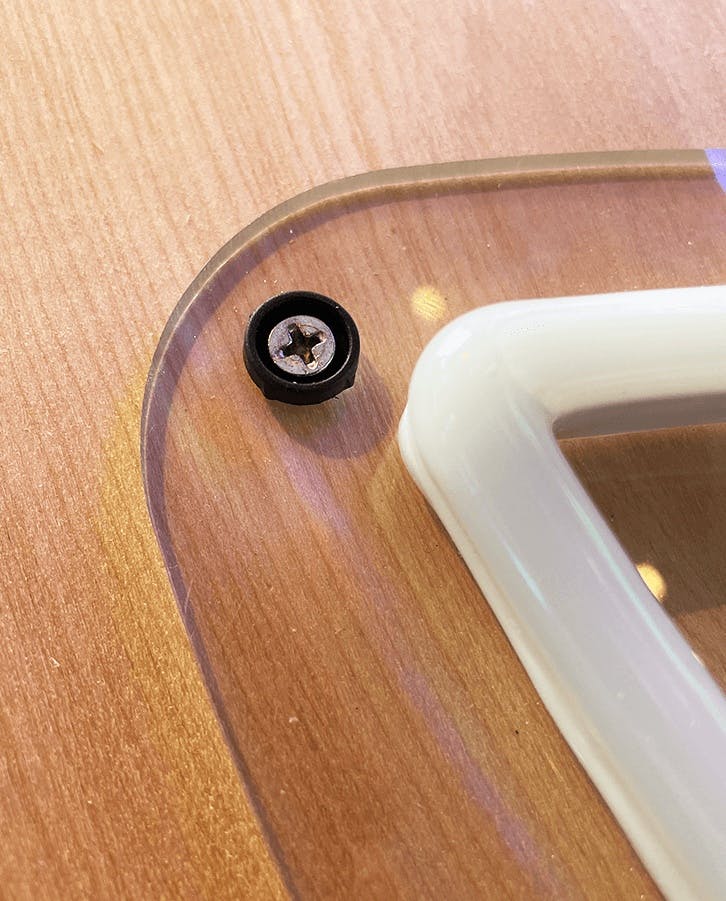
When the screws and black rubber washers are drilled in, this is how they should look before you put the silver end caps on.


stand-off screws for neon signs
a yellow neon sign hanging with a stand-off screw

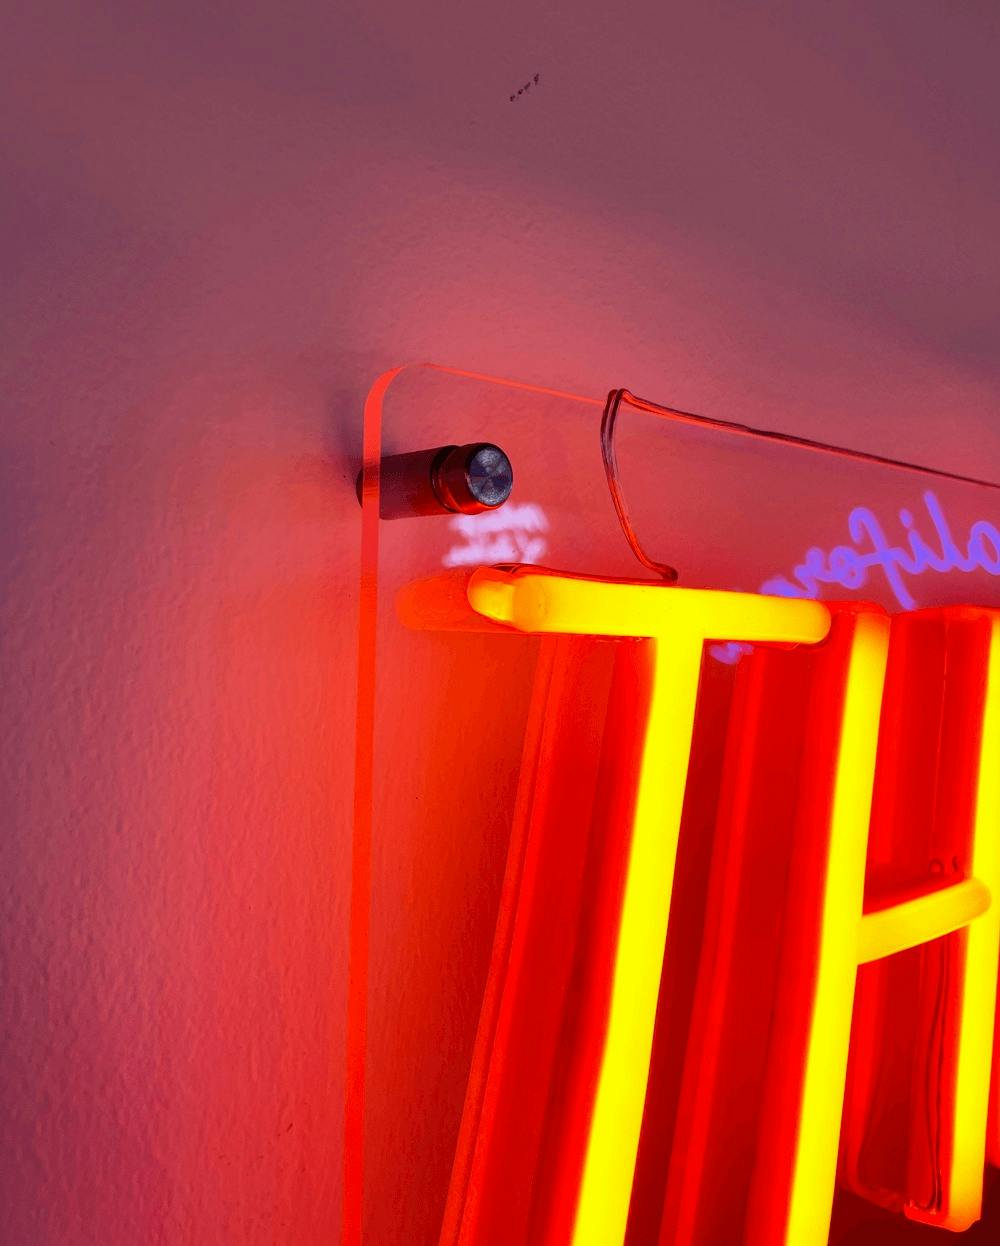
This is how your stand-off screws should look once fully installed.

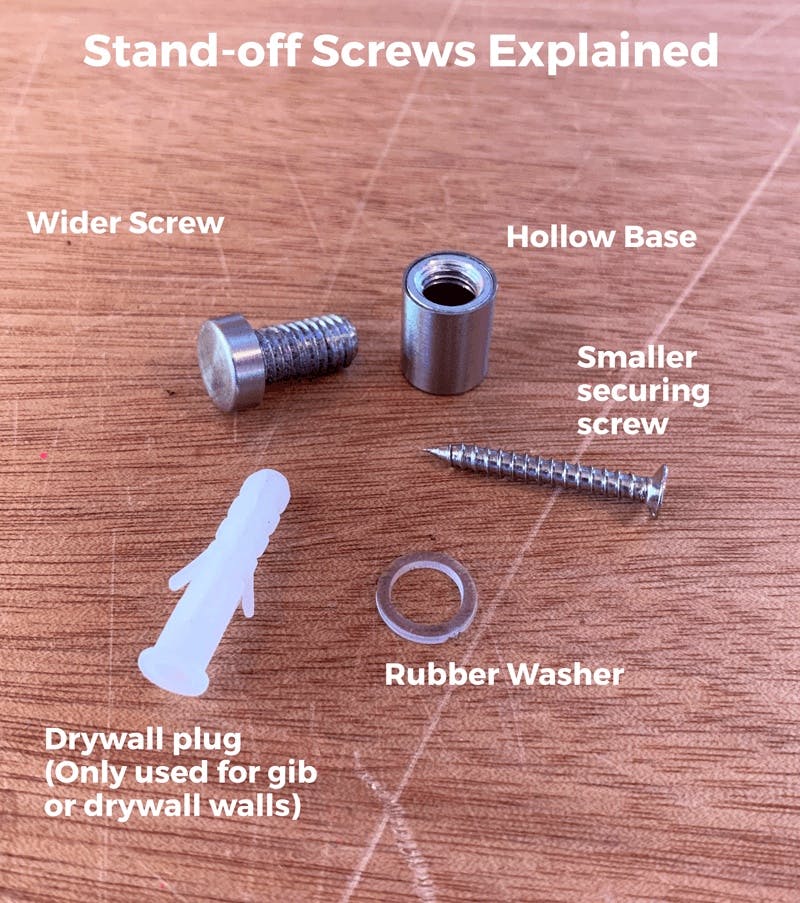
How to hang your LED neon sign using our Stand-off Screws.

These mounting screws are great for surface installations like walls. This is our most commonly selected installation method.

Step 1:
Lift only your neon sign and place it flat up against the intended wall or space. If it’s super long or heavy please ask a friend for assistance.
Step 2:
While one person is holding the sign, use a marker pen to dot the pre-drilled holes in the wall where the screws will be going — this will be super helpful when you get the drill out next. Make sure you’ve finalized where you’ll be hanging the neon sign before moving on!
Step 3:
Place the sign back in the box or on a safe surface to avoid scratching the acrylic backing. Get your drill equipped with a smaller twist drill bit than the diameter of the screws and drill pilot holes exactly on the points you marked on the wall using your marker in step 2.
Step 4:
Pick up the mounting pin and unscrew it. Take the hollow base of the mounting pin and place it up against the previously drilled pilot hole. Fit the smaller silver securing screw through the hollow entry. Now with a new screwdriver drill bit, screw the small silver securing screw directly through the hollow base and into the wall, securing the hollow base to the wall. Repeat this until all hollow bases are secured to the wall.
Step 5:
Now get your sign and place it up against these bases. Hopefully you’ve lined them up correctly. Then simply grab the remaining wider screws and screw into each base securing the sign to the wall. Make sure they’re tight!
Final Step:
Now plug the hanging neon sign into the transformer (black/white box), and then into the wall outlet. It should illuminate no problem.

See? You don’t need to know how to handle specialized electrician tools to hang an LED neon sign — just a screwdriver and this guide!

How to hang your LED neon sign using our Suspension Wires.

The hanging wires are great for shopfront installations or installing suspended neon signs.

Step 1:
Take your sign and measure the distance between the pre-drilled hanging holes located near the top of the signs acrylic backing. Mark this distance out on the surface the silver vertical mounts will be drilled into.
Step 2:
Get the silver vertical mounts and place them on the overhead surface, with the center of it sitting directly on the point you marked out in Step 1. You will notice 3 screw holes around the edges of the vertical mount. Use the marker again and mark those 3 holes out for drilling!
Step 3:
Even if you don’t know how to use a drill, this part of hanging a neon sign is easier than it sounds. Grab your drill equipped with a twist drill bit and drill pilot holes exactly on the points you marked on the overhead surface using your marker in Step 3. Then, using your screwdriver drill bit and the vertical mount, drill the smaller silver screws into the overhead surface to secure it in place.
Step 4:
Next grab the plastic coated hanging wires that also came with your neon sign and measure out how far down you want your sign to hang. Using pliers cut each wire to the desired hang length — leave a little extra for the crimped loop that will hold the sign on the opposite end of the wire from the vertical mount.
Step 5:
To hang the neon sign properly, pay attention to how you can simply attach the wires to the mount by pushing down on the spring powered mouth of the mount and feeding the wire in. Release the mouth and the wire will grip and be stuck firmly in the mount.
Step 6:
Take the small silver crimps and place your suspension wire through one of the two holes in the crimp. Then take that same end through the hole drilled into the acrylic backing of your sign, and loop it back up into the other hole in the metal crimp. Once done, quickly use the plier and squish the metal crimp horizontally across the center of the hanging neon sign to lock it. Repeat this for the other suspension wires too!
Final Step:
Plug the sign into the transformer (black/white box), and then into the wall outlet. It should illuminate no problem.

Now you know how to hang a neon sign with a suspension wire!
suspension wires for neon signs
a neon sign installed with a suspension wire

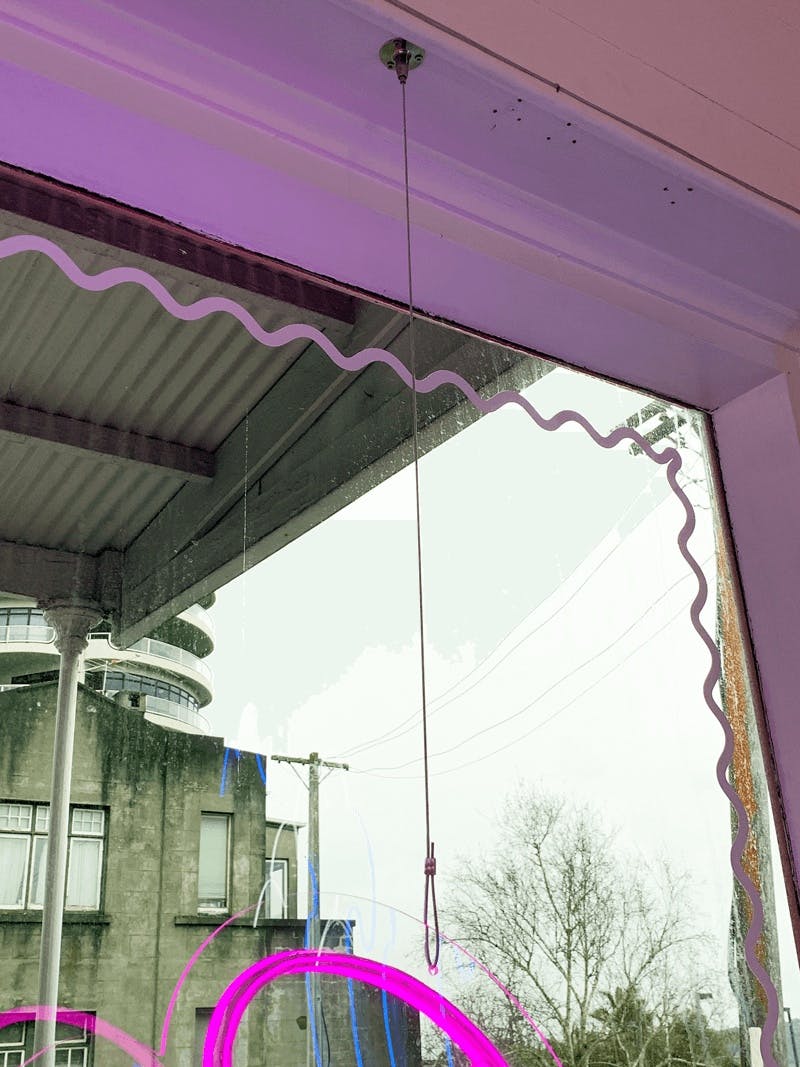
This is how your suspension wires should look once fully installed.

Let’s be friends with benefits

Sign up to receive 10% off your first custom order, and to be in the know about deals and new collection items.

This site is protected by reCAPTCHA and the Google Privacy Policy and Terms of Service apply.

Back to FAQs